Product details
To Install & Use This Library Requires KONTAKT PRO You Have To Download KONTAKT PRO First From Our Website
DEMOS
About Woodwinds Ensembles
Here at Sonokinetic we have a reputation for doing things a little differently, and Woodwinds Ensembles couldn’t be a better example of this. We’ve thrown away the rule book on how multi-sampled libraries could work and created a multi-sampled orchestral series that demonstrates how they should work – the way you want them to….
After developing the most versatile phrase-based libraries on the market, we wanted to go deeper into multi-sampling. A few years ago we dipped our toe into that world with “Da Capo” but are now ready to dive right in. Here we’re providing a toolkit of everyday woodwind performances that perfectly complement our existing libraries and set a new standard in their own right. Presenting the first product in our new “Orchestral Series”: Woodwinds Ensembles.
This library begins a brand new chapter in Sonokinetic’s ongoing sampling odyssey. We’ve embarked on a quest to capture only the most emotive and realistic orchestral performances and develop a new way to play. Our bespoke SACS engine (Sonokinetic Articulation Control System) is a labour of love that we’re immensely proud of and will quickly become second nature to use. It’s simple, logical and utterly playable. We’ve grouped the many many articulations into six logical categories, then sub-divided those. All the woodwinds instruments use the same system – and our future orchestral sections will do too. That’s right – woodwinds are only the start!
If you’re an established composer, already working with your preferred libraries then we haven’t forgotten you either. Use the “Advanced Mapping” interface to set up your own velocity or MIDI controller articulation switching. It’s totally customizable, easy to program and will make sure that Woodwinds Ensembles slots right into your existing template – however you prefer to work.
We could gush all day about our intuitive interface, poly-legato system and humanization options but we’ll let the tutorial videos and demos by some of the world’s most talented composers do the talking for us.
We, at Sonokinetic BV, are very proud to introduce our new Orchestral Series to you and can’t wait to hear the amazing things you, our valued customer base, will produce with it.
Technical Overview
The Interface
Shown left is the main interface for the clarinet instrument. The 4 different instrument ensembles (flutes, clarinets, oboes and bassoons) operate in the same way with only very minor differences. These differences will be highlighted throughout this manual when necessary.
Basic Functions

Play in the blue key range. By default the dynamics are controlled by the MOD wheel but this can be changed to key velocity or a combination of both. More on that later.
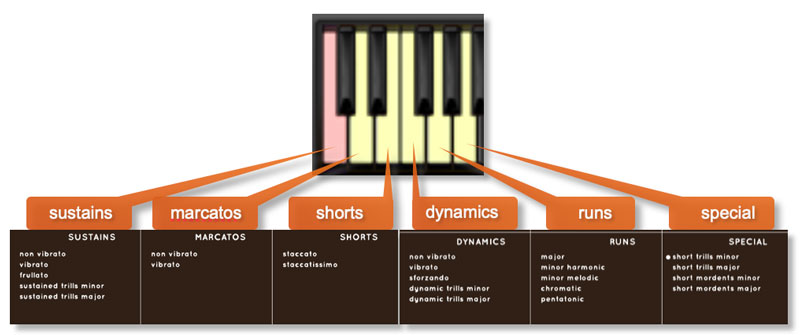
Because woodwinds ensembles has such a huge number of articulations, a brand new keyswitch solution has been created. This is a two-step system which keeps the number of keyswitches to a minimum and also standardises the articulation switching across all of the 4 different instruments (flutes, oboes, clarinets and bassoons). The group of yellow keyswitches at the bottom of the keyboard have two uses and are split into white key and black key functionality.
Articulations have been split into 6 groups – sustains, marcatos, shorts, dynamics, runs and specials. The white keys select articulation groups (shown below).
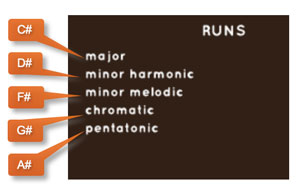
The black keys, from C# up to A# select an articulation within the selected group. Which articulation this is will depend on the articulation group selected, but the keys from C# to A# will always correspond to the articulations as read from top to bottom in each articulation group.
For example, if you wanted to choose shorts staccatissimo, you would select the E keyswitch for the shorts group and then D# for the staccatissimo articulation.
The engine will remember whichever articulation you’ve last used in each articulation group – so it’s easy to go back to it just by pressing one keyswitch for the group.
You can also choose an articulation by clicking it on the interface.
Secondary Articulation Controls
Marcato, dynamics and runs have additional secondary controls. Below are listed the default keyswitches to select these. By default these keyswitches are towards the top of the keyboard (although they can be moved if you prefer).


MARCATO: keyswitch controls for note length – quarter (F), half (G) and whole note (A). These are relative to your host DAW tempo. The last option is to play the note at the originally recorded length (B).

DYNAMICS: keyswitch controls for crescendo (C#), decrescendo (D#) and note length (F, G, A)

RUNS: keyswitch controls for up (C#), down (D#), 1 octave range (C), 2 octave range (D)
All of these various additional controls can be selected either by clicking the icon or by using the upper keyswitches indicated above.
Articulations
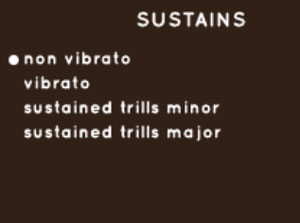
Sustains
Long played notes both with / without vibrato and major and minor trills. The sample length is set at the maximum sustained length of a real-life player.
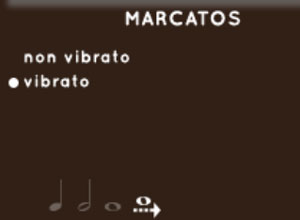
Marcatos
Played louder, more forcefully and have a specific note length set at a quarter, half and whole note. These notes will only set the maximum note length in relation to your project BPM, you can release the notes at any time to end them earlier. The last option is to play the original length sample, as recorded.

SHORTS
Shortest notes in two types: staccato (longer) and staccatissimo (shorter).
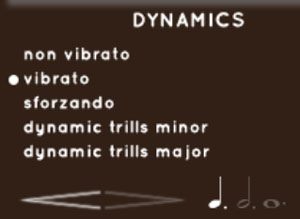
DYNAMICS
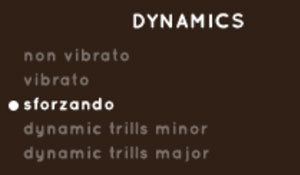
Articulations that change in tone and dynamics throughout the note performance. There’s a huge range of variety available, with vibrato, non vibrato, sforzando, and dynamic trills major and minor, all recorded a 3 different lengths. Every articulation except for sforzando also has crescendo or decrescendo options.
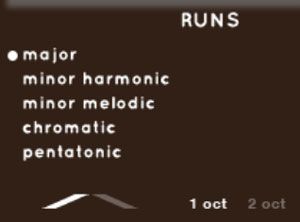
RUNS
Fast ascending / descending scales in one or two octaves. The 5 different run scales are tempo synced so that they fit to the tempo of your DAW. Two tempi are recorded: 150 and 115 BPM, to ensure smooth playback in most projects.
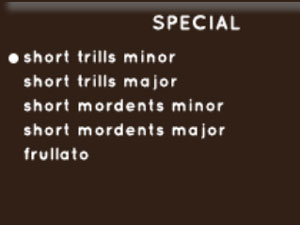
SPECIAL
Ornaments and other specialised techniques. There are short trills and mordents in major and minor variations – tempo synced to your host BPM. These articulations can be used as ornaments to a melodic phrase.
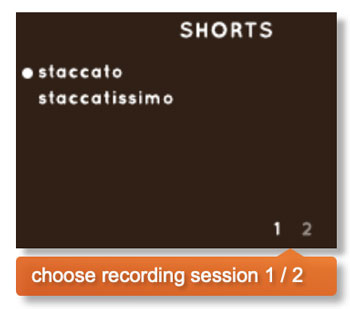
Alternate Recordings
Some articulation groups also have alternate variations of recording session. If this is the case then you will see a 1 2 graphic in the articulation group interface. Click the number to select your preferred recording session.
Round Robin Reset
Woodwinds Ensembles articulations contain many round robin variations. The round robin reset keyswitch is used to reset these – it is F#6 by default.. Alternatively you can program midi note G#-1 (that’s midi note number 8) for this too if you want to keep this outside of the keyboard range. Trigger one of these at the start of your project for consistent playback.
Stacking Articulations
You can stack up to 3 articulations together by simply pressing the appropriate keyswitches together, before you play a note. The articulation associated with each group is saved, so that you can set articulations for each group, and then simply select the group keyswitch to return to it.
To stack articulations using the UI, select your first articulation, then add articulations to your stack by cmd/ctrl clicking up to 2 subsequent articulations.
Dynamic Keyswitches
You can assign one or more articulations to 3 dynamic green keyswitches at the bottom of the keyboard, shown here. By default these are A-1, A#-1, B-1

Articulations can be assigned and de-assigned by clicking on the orange keys on the mini keyboard on the UI. The current selected group (or stack) will then be assigned to that keyswitch. The keyswitch is dynamic in that it is active for the duration it is held for. A dynamic keyswitch can also be de-assigned by clicking on its details in the Mapping screen.
TIP: Dynamic keyswitches are useful for playing embellishments by quickly switching from one articulation to another. For example, assign a sustained trill articulation to a dynamic keyswitch and then activate it for a quick trilled flourish whilst playing a melody.
Purging
Clicking the main articulation group headings will purge that group from memory. The whole group can be reloaded by clicking the heading again. You can also load individual articulations by clicking them and you can unload an articulation by alt clicking
Additional Flute Articulations
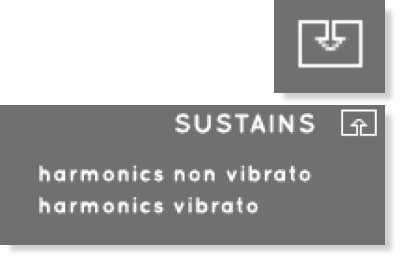
Flutes have 2 additional sustain articulations on a separate page “harmonic non vibrato / harmonic vibrato” which can be accessed using the icon in the SUSTAIN articulation group – shown here.
You can also switch between the two pages with keyswitch B6 (by default). Then use the keyswitches in the normal way to trigger the additional articulations.
Microphone Mixing
Sonokinetic’s Woodwinds Ensembles were recorded in the same space as their other orchestral libraries such as Sotto, Capriccio, Minimal and Da Capo. This means the same microphone mixing options too – close, decca tree, wide and far (balcony). There’s also a pre-mixed tutti position, for a full hall sound, which can be switched in and replaces the individual mics.
Click the microphone icon to open up the microphone mixing options.
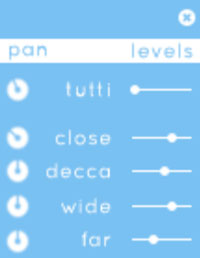
This library gives you two main options for microphone mixing: Firstly you can choose the tutti position, which is a pre-mixed position, ideal for a quick mock-up. Panning and levels are adjustable by dragging the dials and sliders respectively. cmd / ctrl + click to reset to default.
Alternatively, you can mix between up to 4 microphone positions yourself: close, decca tree, wide and far (balcony). Adjust the pan and levels of each using the interface shown here.
NB: You can use either Tutti or individual microphone mixing – not both.
TIP: A great sounding multi mic mix are combinations of close with decca, or decca with the wide or far mics.
Help Screens
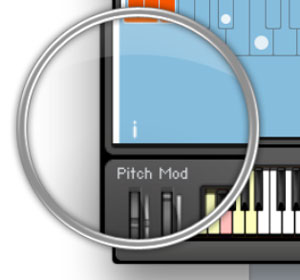
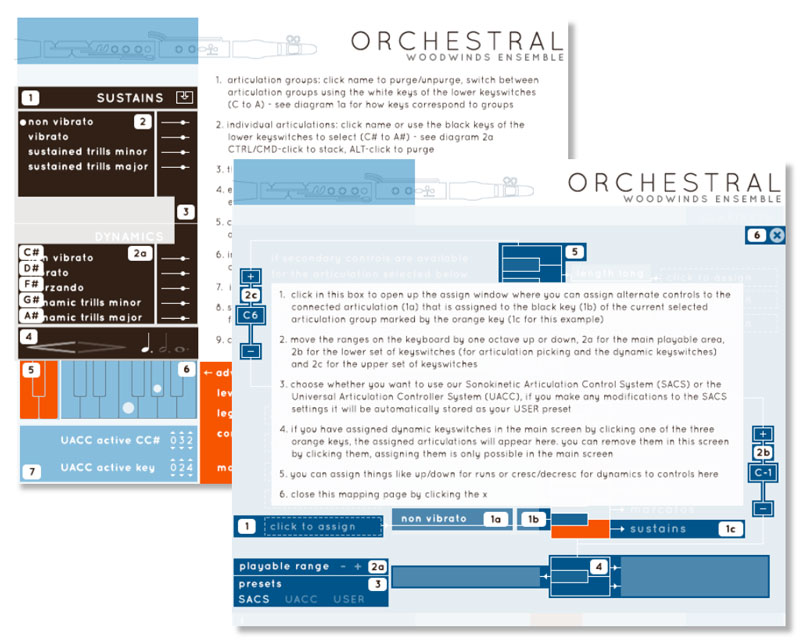
By pressing the i graphic on the bottom left hand side of the interface you can activate a comprehensive help screen overlay. The information you see here will vary, depending on which menus you have open.
Options Menu

Open the options menu by clicking the gear icon
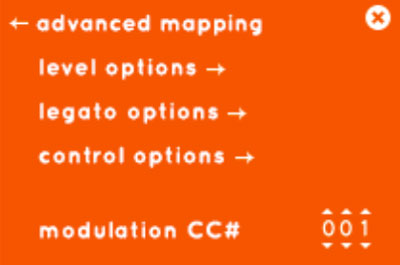
Within this menu you can customise the performance and sound of the library. The root page of options enables you to reach the level, legato and control options pages.
Modulation CC#
This control allows you to set any CC# to modulate the instrument, the default is CC#001, the MOD wheel. Use the up / down arrows to set your own modulation controller, for example CC#011 for expression pedal. In the explanations below we will assume that the MOD wheel control is being used.
Level Options
Dynamic Range
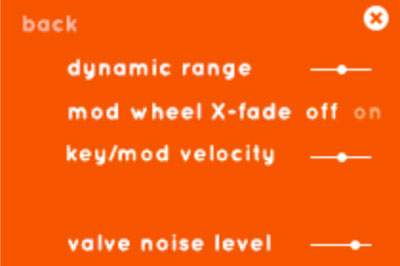
The dynamic range slider specifies the amount of variation in dynamic that is available at the extremes of the modulator or key velocity. Dragging this slider to the left will decrease the dynamic range – dragging to the right will increase the range.
MOD Wheel X-Fade
The instruments can function in 2 different ways: By default dynamics is handled by the MOD wheel or whatever other MIDI CC# you specify on the options menu (shown above) – this is mod wheel x-fade on.
To control dynamics via the velocity of your keypress turn mod wheel x-fade off. This will turn off the automatic crossfading of dynamic layers via the MOD wheel and engage a further control called key/mod velocity which allows you to tailor how much dynamic is controlled by key velocity and how much by the MOD wheel.
Pull the slider all the way to the left for purely keyswitch dynamics.
Position in the centre for keyswitch dynamics with additional amplitude controlled by the MOD wheel.
Pull all the way to the right for amplitude controlled only by the MOD wheel – with no switching between dynamic layers.
Key / MOD Velocity
As detailed above, the key/mod velocity slider determines how much effect the MOD wheel or key press velocity has on the selected note.
Valve Noise Level
This control is used to introduce valve noises to the playback. This is useful for creating some more realism and an upfront, intimate sound when combined with close mic’ing.
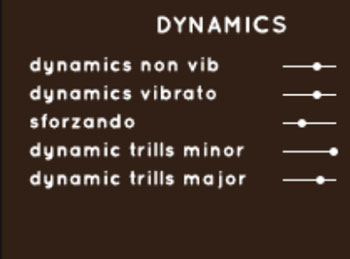
Individual Articulation Volumes
When the options menu is open, you can adjust the individual volumes of the different articulations within each articulation group. Each one has a slider which you can use to set the levels. cmd / ctrl + click to reset to default.
Legato Options
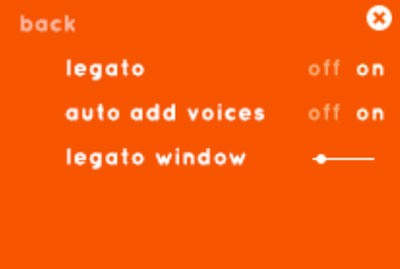
You may be familiar with the concept of legato which plays realistic legato transitions between notes. By default Woodwinds Ensembles operates using a poly-legato system. In this menu you can adjust that behaviour.
LEGATO
You can turn off the legato transitions for fully polyphonic behaviour. However, the default legato is polyphonic too, so in most cases you would not normally need this control and it can remain on.
AUTO ADD VOICES
This control is set to on by default as the legato engine will automatically add polyphonic voices when it detects obvious chords are played within a certain timeframe window. If you want to be able to play very fast lines within a poly-legato passage you might want to turn off auto add voices since it might recognise very fast notes as part of a chord.
LEGATO WINDOW
The legato window sets the time frame where notes will be considered separate or part of a legato performance. A short setting allows for fast legato playing, see above in the auto add voices explanation for extra info on this. You can also force the instrument to add voices by using the ADD VOICE keyswitch (shown below). This is a blue keyswitch towards the top of the keyboard at E6 by default. Holding this key whilst playing a note in the playable range will manually add a voice. Just play your first note – then hold the add voice key and play another.

Control Options
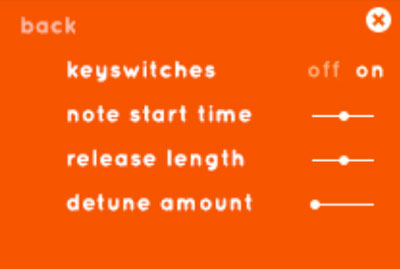
This set of controls adjust the sound and functions of the instrument. We have chosen default settings that in our opinion makes the instrument sound its best. You can use these control options to tweak things to your own liking but bear in mind that the instrument may not sound as good with custom settings. Always store an archived original version of your instruments in case you make changes beyond your control. You can also download a fresh new pack of instruments with default settings from your Sonokinetic User’s account if you need them.
KEYSWITCHES
This on / off control activates or deactivates keyswitch play. For those that prefer an articulation per instrument rather than keyswitches, this allows the keyswitches to be removed from the instrument.
NOTE START TIME
You can adjust the sample offset point of notes with this slider, making samples subtly tighter or looser. Drag to the right for tighter timing, left for looser timing.
RELEASE LENGTH
Adjusts the playing time of releases for longer or shorter release tails. This may be useful if you want to cut the tails short when playing quickly, or lengthen them for slow playing. Drag the slider left for a shorter release tail, right for a longer one.
DETUNE AMOUNT
This slider varies the tuning randomly within a range that increases as the slider is pushed to the right. Using this control can add character to the sound by subtly detuning the notes of the performance, adding humanisation.
Advanced Mapping
The mapping options for this library are extensive and fully customisable. This makes it really easy to integrate Woodwind Ensembles into your existing orchestral template, however you prefer to work. If you’re already using products from other companies and want this library to work in the same way then it’s easy to set up. You can reassign the keyswitch ranges of the instrument and also the playable range. You can also use this menu to reassign certain articulations to other MIDI CC# controls, velocities or the pitch bend wheel. Although the mapping page looks complex, it is actually quite simple and the interface scripting will help you out.


Open the advanced mapping menu by either clicking on the keyboard section of the UI, or by opening the options menu with the gear icon and clicking advanced mapping
Moving the playable ranges & keyswitches
You can remap the playable range and keyswitches for articulations in octaves, with the + / – controls shown below. This is useful for a number of reasons. Some people will simply prefer all the articulation keyswitches in the same area, either at the top or bottom of the keyboard – especially if you have a smaller keyboard without 88 keys. Others may want to load all 4 instruments and set the playable ranges to overlap, for tutti playing in octaves.
There are 3 controls which are used for this purpose. The keyswitches will move up and down the keyboard in increments of one octave. Click the + / – controls to move the range up and down. You will see the positions of the keyswitches change on the Kontakt keyboard.
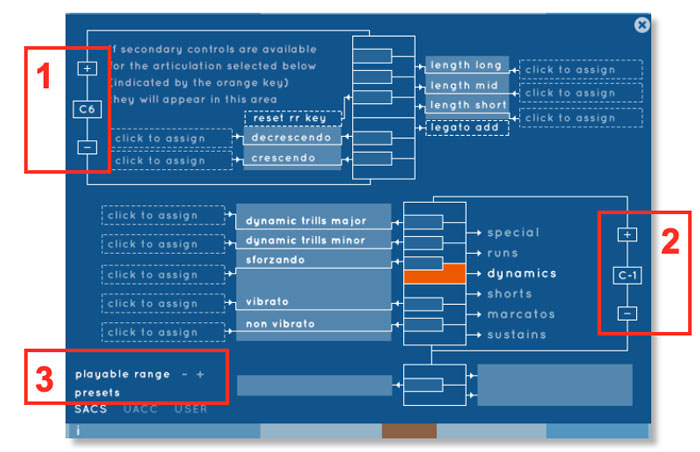
1 – Moves the keyswitch range for the secondary controls (note duration, run direction and crescendos or decrescendos)
2 – Moves the lower articulation group range.
3 – Moves the playable range
Reassigning Articulations
As we’ve previously covered, the articulation switching is normally performed by a combination of the black and white keyswitches. However, it is also possible to assign additional controls to velocity, CC# or the pitch wheel.
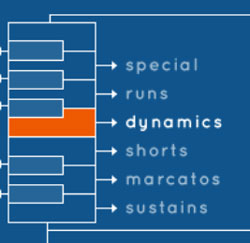
Choose an articulation group either by pressing a keyswitch in the normal way, or choosing one in the mapping screen (dynamics is shown as an example here).
You will then be presented with every articulation within that group and each one has an arrow from a box which reads click to assign (shown below is the sforzando articulation). Click the relevant click to assign legend which corresponds to the articulation you wish to reassign.

A window will open, giving you the option to assign the articulation to CC value, KK value, pitch wheel or velocity (where possible).
Then click into one of these 3 options and you can assign values. Click apply when you’re done. You can clear remapping by clicking clear.
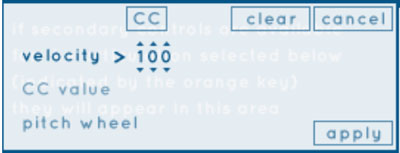
VELOCITY
Set a velocity value from 1-127
The articulation will trigger above that value when you play in the playable key range.
NB – the keyboard / velocity slide will be disabled and hidden if you assign using velocity
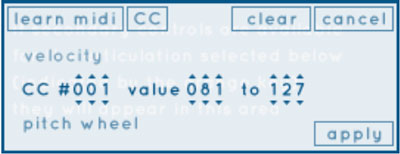
CC VALUE
Set a MIDI controller (CC#) from 1-127
Set values from 1-127
You can also LEARN MIDI by clicking the button and then moving a controller of your choice
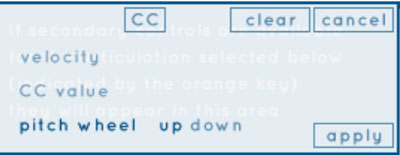
PITCH WHEEL
Set to up or down. This function can be particularly intuitive for articulations like up/down runs.
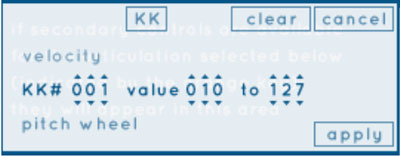
KK VALUE
Assign one of the 8 dedicated, assignable knobs on your Native Instruments Keyboard to trigger your articulation change within the given range
Mapping Examples
To give an idea of what’s possible with customisable mapping here are a few examples, demonstrating some useful possibilities:

In the RUNS articulation group, the pitch wheel has been mapped to run direction. Pulling down will change articulation to downward run, and pushing up will change to an upwards run.
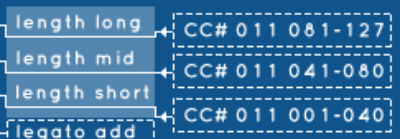
Here the expression pedal (CC#011) has been set up to control the length of the notes in the dynamic articulation group. A value of 81-127 will play a long note, 41-80 a mid length note and 1-40 a short note.
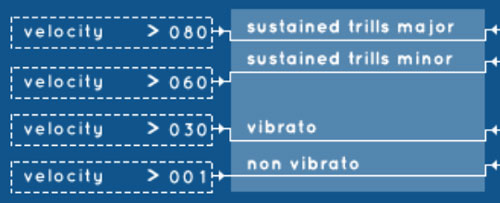
Here is some custom mapping for the sustain articulation group. We have set up keypress velocity to control the type of sustain articulation. A velocity of 127-81 will play sustained trills major, 80-61 will play sustained trills minor, 60-31 will play vibrato and 30-1 will play non vibrato. This kind of mapping set up is very useful as it leaves your right hand to play the melody with velocity controlling articulations, whilst your left hand can still control dynamics with the MOD wheel or another chosen MIDI controller.
Of course, there are so many different ways to map articulations using this system. Be aware that assigning velocity mapping will always take priority over other types of mapping. Also, don’t forget that if you assign a particular articulation to velocity 001 then you are restricting your patch to just the mapping that you have set up. Our advice would be to leave the lowest range of your velocity mapping completely unmapped, so that you have the ability to still use articulation keyswitches etc when playing with a light velocity.
CLearing mapping / reverting to default
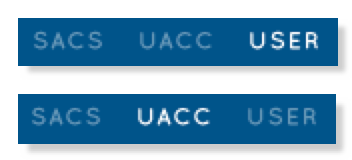 You can clear your own USER mapping by cmd / ctrl + click on USER (bottom left of interface)
To reset the UACC mapping to default just cmd / ctrl + click on UACC (bottom left of interface)
SACS, UACC & User Articulation Presets

At the bottom left of the advanced mapping interface you can choose one of 3 preset systems for articulation control. The default is SACS (Sonokinetic Articulation Control System). Once you make a change to the default SACS preset it becomes a USER preset.
The UACC (Universal Articulation Controller Channel) preset syste m can also be used. This is a ‘universal’ system of articulation switching which has been developed for libraries developed for Spitfire Audio. More information about this system can be found here:
http://www.syntheticorchestra.com/blog/?10
The basic premise behind UACC is that it uses a particular modulator value (CC#032 by default), or a particular key velocity to switch between articulations. For example, using MIDI channel #032 you would send a value of 20 and it would be recognised as a sustained legato articulation in any sample library instrument which used the UACC system.

You will then see the interface change to display the UACC controller values for each articulation. These have been pre-configured for your convenience to the most common articulations.

Select the UACC system by clicking the legend in the advanced mapping interface (bottom right).
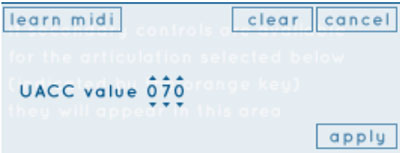
You can then assign values to the various articulations in the normal way, by using click to assign, setting a UACC value and clicking apply. You can also learn midi if required.

Content
44.1kHZ – 24 Bit and 16 Bit NCW format
16BIT – 109.000+ SAMPLES
24BIT – 109.000+ SAMPLES
16BIT – 60,05 Gb Uncompressed
24BIT – 90,53 Uncompressed
Royalty and copyright free
content license
Instrument Patches
4 multi-sampled recorded woodwinds ensembles (3 players each)
– Flutes
– Clarinets
– Oboes
– Bassoons
Time Machine Pro & Sonokinetic’s Intelligent Tempo Mapping
Sampled Instruments
4 recorded microphone positions
– Close
– Decca tree
– Wide
– Balcony (Far)
…and a proprietary stereo ‘Tutti’ mix




There are no reviews yet.